The ability to perform retopology in Maya is a useful skill. Retopology is becoming an increasingly essential part not only of game development, but also film and TV production. As powerful as it is, high-resolution models just aren’t efficient enough to be used directly with today’s hardware. This means that a lower, proxy version of the model is needed to speed up animation and rendering. This, when used with a displacement map, will give the illusion that the model is much more complex than it seems when rendered.
But reducing a model with millions of polygons down to a few thousand can be a tedious and time-consuming job. Luckily, there are some great tools that will automatically generate a new version of a high-polygon model, with more manageable geometry and a decent edge flow.
Want to upgrade your 3D modelling kit? Check out our pick of the best 3D modelling software (opens in new tab) around right now.
What software can be used for retopology?
ZRemesher which is part of ZBrush (see our ZBrush 2019 review (opens in new tab)), is a popular and impressive offering allowing you to add guides that the resulting topology will attempt to follow, meaning your model will be cleaner and more usable. With this said, it does still require some reworking, but offers you a good starting point.
3DCoat and Maya also offer tools to help with retopology, but Maya’s offering could be seen by some as a little basic. The Reduce tool is pretty much useless in this area. Although it will reduce the number of polygons, the resulting topology is a mess and would take far too long to clean up manually.
The Quad Draw tool, which is more geared towards retopology, enables you to draw each quad, or a series of them, to gradually build up the topology you need while using the high-resolution model as a guide. Although this is a decent solution it can be a little time consuming when working on a full character or a more complex model.
- Cinema 4D tutorials to up your 3D skills (opens in new tab)
The Conform tool will speed up workflow in this area. It takes one model and shrink wraps it around another’s surface, to create a basic primitive. Then, you can conform it to the high-resolution model, which gives a nice, clean area quickly and efficiently.
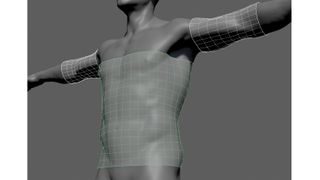
This can’t be used exclusively, but for larger areas like limbs or a torso, it can be a time saver and give a very close approximation of the source model, meaning normal and displacement map generation is much more accurate. Let’s take a look at Conform in action.
01. Create a cylinder

Bring the high-resolution source model into the scene and create a basic polygon cylinder that roughly matches the topology you require, and delete the caps from either end. Don’t worry if it’s not exactly right, you can always add more edge loops later to get a better fit. Reposition this so it sits around the model’s torso and then generate two more similar cylinders, which will be used to create the arms.
02. Go live

Next, select the high-resolution model and make it live by clicking on the small magnet icon in the toolbar. When you make an object live you’re essentially making it sticky, so other vertices in the scene will stick to its surface. This is perfect when using the Quad Draw tool as each quad automatically follows the contours of the model. In this case, you will use it to wrap each cylinder to the model instead.
03. Conform

Now you need to tell each of your cylinders to wrap itself around the live model, so select the torso cylinder then go to Mesh > Conform and open up the options. You’ll see that, by default, the tool will be set to the Along Normals selection, which will snap each vertex to the surface but only move it along its plane normal, which will retain some of its original shape and spacing. This is perfect for retopology.
04. Adjust the fit
At this stage the model will be stuck to the live surface, so you can tweak the vertices to get a better fit. You can also add more edge loops to help soften the silhouette, but you will need to perform another Conform to adjust the new topology. You can also perform this on a per vertex level rather than the whole model. When you’re done simply turn off the live surface and continue working.
This article was originally published in issue 248 of 3D World (opens in new tab), the world's best-selling magazine for CG artists. Buy issue 248 (opens in new tab) or subscribe to 3D World (opens in new tab).
Read more:
- 3D sculpting: how to sculpt with style (opens in new tab)
- 24 free 3D models (opens in new tab)
- These 3D portraits are unbelievably realistic (opens in new tab)


